Saturday, June 26, 2010

4. An active portrait

Finding an appropriate person and activity was the first challenge for this exercise.  I started by asking Heidi to allow me photograph her cooking dinner and completed a sequence of images with this activity.  Later that weekend a friend approached me to help her with some photography for a new Physiotherapy practice she was starting.  As part of this she wanted some images of her treating someone on the massage table, an ideal opportunity to create an active portrait.  I have decided to blog both sets of images as they both presented different challenges and qualities in the final images.

The primary difficulty in photographing in our kitchen is that in Germany the kitchen has a low priority for space in a home and as a  result is a quite confined space.  I tried to work around this by shooting through the front window as well as from inside the kitchen.  I could have opted for a relatively wide angle lens, 24 or 50mm, but wanted to stick to medium to long telephoto's to both fill the frame and preserve the proportions of the face.

My first two shots were through the kitchen window with long telephoto's

200mm, f/4, 1/250, ISO 800

300mm, f/4, 1/180, ISO 200

Both images demonstrate the concentration needed when using a sharp knife.  The colours are well saturated and the shadows are not too pronounced as the lighting through the window was not direct sunlight, but diffuse light reflected from nearby buildings.

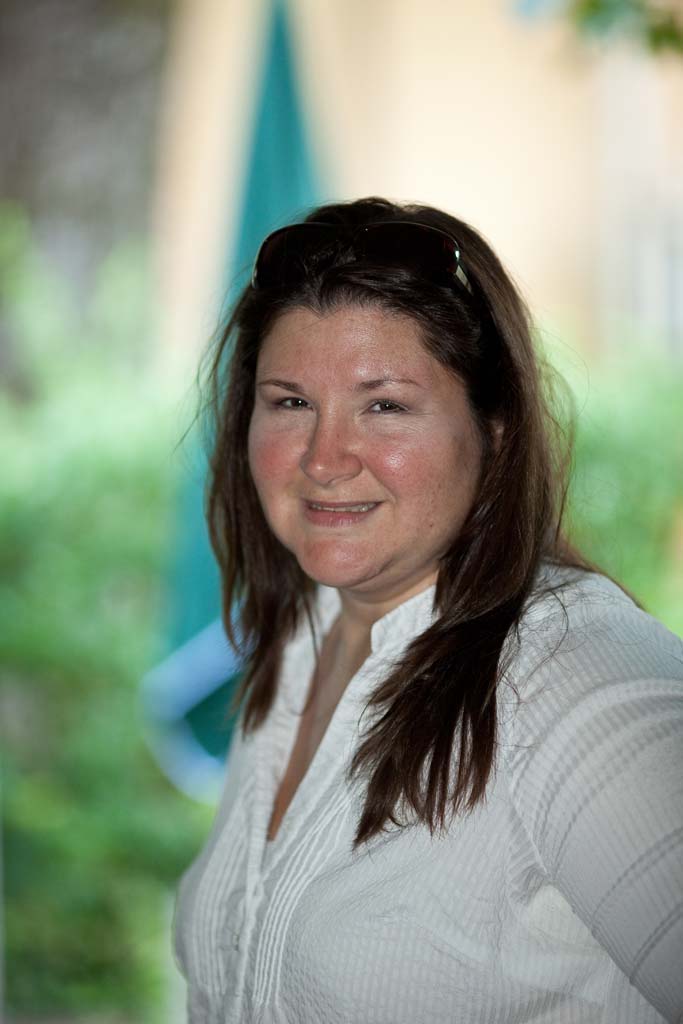
Moving indoors I had to shift to shorter focal lengths, either 85mm or 135mm.  The 135mm enabled me to fill the frame with Heidi's face:


135mm, f/2, 1/90, ISO 800

135mm, f/4, 1/30, ISO 800


Both images are quite soft, partly due to the fact that the low light forced me to use a lower shutter speed than I was comfortable with and a very large aperture.  I could have boosted the ISO beyond 800, but I find the noise becomes very noticeable at 1600 or 3200.   However, I like the softness and the slight halo'ing caused by the back lighting.  Again there is no eye contact, but in each case the facial expression is gentle but concentrated.

Moving to the shorter focal lengths, I was able to include a little more of the background and produce more of an environmental portrait that illustrates what Heidi is doing.

105mm, f/4, 1/30, ISO 800


85mm, f/2, 1/90, ISO 800

In each of these images the back lighting adds an ethereal quality and although the image is no longer dominated by Heidi, I like the out of focus background - it is just clear enough to strongly suggest that this is a kitchen and that Heidi is cooking.  None of the previous images really made that clear.

Finally as it got a little later and the light dropped, we turned on some lights in the kitchen.  This changed the lighting dynamic adding a warm glow to the images.

85mm, f/2, 1/60, ISO 800


85mm, f/2.8, 1/45, ISO 800

The profile shot is the first that actually contains Heidi's eye and this is the problem with this sequence.  Cooking is a very concentrated activity and leaves limited opportunity to really engage with the subject.  Combined with the lack of physical space this left me unsatisfied with this sequence.

The sequence of images that I prepared for Anke did not give me the opportunity to frame a head and shoulders shot, but did provide much better opportunities for interaction and better eye contact.  In this case I was shooting indoors and used a pair of 400J monoblock flash guns in soft boxes to provide the light.  I was also working with more space, but trying to create a variety of images in a fixed time.  As a result all of the following images are made with my 24-105mm f/4 zoom.  I set the shutter speed at 1/125s as this would sync with the flash and provide sharp images.  In the previous sequence I selected a very wide aperture, partly driven by the available light, but also by the desire for a soft look with background out of focus.  In this case my job was to illustrate a physiotherapist working in a medical environment, thus both Anke and her patient needed to be in focus.  I went for a safe f/8 and adjusted the light intensity to deliver a correct exposure.

95mm, f/8, 1/125, ISO 100

92mm, f/8, 1/125, ISO 100


96mm, f/8, 1/125, ISO 100

85mm, f/8, 1/125, ISO 100

In this sequence the final image has the best facial expression, concentrated but relaxed, with a very clear eye line to the patient.  The next two images are slightly different, in both the portrait could be said to be the patient rather than the physiotherapist, however, it is the interaction between the two that makes the images interesting

47mm, f/8, 1/125, ISO 100

40mm, f/8, 1/125, ISO 100

In both shoots, the primary challenge was to find an angle from which I could capture expression and some action. The second sequence worked better in this respect, but aesthetically I much prefer the soft focus, back lit images in the first sequence.  The first sequence was purely for art, the second was essentially a gig, although one for which I required no payment.

Monday, June 7, 2010

3. Experimenting with light

For this exercise once again Heidi is my subject.  We decided to take the photo's late in the afternoon on a very hot sunny summers day.  This would provide a variety of natural lighting possibilities, together with a local subway station for overhead fluorescent lighting.  To supplement the natural light I took a large Lastolite reflector with various covers and an on camera canon 580 EX II speedlite.  Having completed Exercise 1 using studio lighting I decided not to utilize this once more in the current exercise.  I have used the same lens (135mm prime)  for each photo and as much as possible a similar framing.  The aperture in all shots is f/2 or f/2.8 and I have used ISO 400/800 throughout.  Other than that the major variable is the shutter speed.

Although I did not consider it at the time, the fact that Heidi wore a white blouse, meant that I was able to manage the white balance shift far more easily than might have been the case.  In all of the following images white balance is taken from the white material.  I have created more than the requested number of images as I also wanted to experiment with and then illustrate the effect of fill flash.

As we stepped out of our front door, we were immediately in shade, but with some reflection of light from a white building opposite.  This created a soft golden light with minimal shadows:


Moving on we found a wide open space in a park, with strong sunlight, creating a very unflattering harsh light with strong specular reflections from the face


we did try using the reflector as a fill-in, but the light was so strong that Heidi could not open her eyes.  This was the best we could do, using a gold reflector  to warm the image - but not good!


Moving on I took the two following images on the steps heading down to the subway station.  In both cases the primary light on Heidi's face is the overhead strip light, however in the first case looking down the background is lit very differently from the second image where the background is daylight.


Further down in the station proper I took the following image entirely under overhead strip lighting.  This provided very even non-directional light, reflecting off a white floor so providing shadow fill.


In the following sequence the light is also provided by overhead lighting, but from one side only creating strong shadows on the right of the image.  In the second image I have added some fill flash with a -1eV setting on the flash


In my final images I have used an indoor situation with strong back lighting, requiring fill flash to obtain an acceptable exposure.  In the first of the two images I have aimed the light directly at Heidi creating strong reflections and a poor image.  In the second image I have bounced the same on camera flash off the ceiling to soften the image


2.2 Thinking about location

Having completed my location hunt I reviewed the images back on my computer and selected the park bench.  My reasons are two fold, first of all the location offered a good negative space background, but with some colour and texture, secondly a bench enabled a seated pose for the photo.

I have created two final images from this session, the first is a head and shoulders shot, bordering on a torso shot:

135mm, f/2, 1/2000, ISO 400

In this image the background blends as a texture, bu is still recognizable as foliage, adding to the image without dominating.  I also selected a wide open aperture of f/2 on my 135mm prime to accentuate this effect.  The ISO is too high and reflects the fact that I was also using this session for the next exercise and was moving from artificial light, to shade, then Sun.  However, ISO 400 on my 5D2 looks pretty much the same as ISO 100 on my older 40D and other than the fact that I pursue the highest image quality possible I could leave the camera at this setting and get more than acceptable results.

To take further advantage of the location and include the bench in the image, I made the following full body shot:

135mm, f/2, 1/3000, ISO 400

Sunday, June 6, 2010

2.1 Thinking about location

The first aspect of this exercise was to find and photograph 6 differing locations as backdrops for a whole body or torso shot.  For this I was looking for visually interesting backgrounds, but not too interesting, the object being portraiture, not landscape.  The following 6 images were all taken within a kilometer of my home and so benefit from being easily accessible.  All images were taken with my 135mm prime, the lens I would most likely use for the actual portrait meaning that the framing and perspective should be preserved for the actual shoot.

1. Quirky


This background combines a simple white background with a single very colorful inclusion.  The arrow on the sign adds an element of quirkiness, implying no parking, i.e. do not stand here.  There is enough negative space for a head and torso shot, but there is the risk that the sign will dominate the composition.

2. Park Bench


This is a very simple location, offering a good prop for the model to sit on and a diffuse background.  I like this for the simplicity and the fact that the hedge is far enough back to be thrown into blur in the portrait.  This image was also taken at f/4.5, for the portrait I can go as wide as f/2 to increase the bokeh.

3. Flowers


This very colorful background would need very careful choice of clothing for the model to avoid confusion in the image.  It has possibilities, but would need very careful framing to avoid the background overwhelming the subject.  Not sure about this one.

4. Urban Street


A newly built road system has created a few locations that combine a very modern steel construct with large amounts of space between foreground and background.  This would be a good location for a full body shot, with a very diffuse but identifiable background.

5. Modern Development


Similar to the last shot, but structured very differently, this simple rail is located on top of a building with another quite a distance behind.  Once again the idea is to use a simple foreground with a more complex, but out of focus background.

6. Subway Station


Another element in the urban landscape is the subway station.  This offers many different ideas for backgrounds with the sweeping stairs and railway lines, however, the very limited lighting makes for a challenging shot.

1. Portrait, scale and setting

The first aspect of creating a set of portraits was to establish a suitable space with background and lighting.  In this exercise I wanted to emphasize the qualities of the subject and so chose to use a neutral background, a large black cloth that stretched from ceiling to floor.  I also asked my model, Heidi (my wife), to wear black.  This meant that the emphasis of the portraits would be Heidi with no distraction from clothing or situation.  This may not always be the best choice, but for this project enabled me to concern myself mostly with framing and poise.

For lighting I used a pair of 400J monoblock flash guns, remotely triggered with Pocket Wizards.  I used a very simple lighting setup, with one light either side of Heidi and a ratio of 2:1 or 4:1 dialed into the lights.  Each light was in a softbox, one 50x50cm, the other around 75x75cm.  Since completing this project I have read a little more about light placement and now understand that this was rather naive and would produce fairly flat lighting, however, both Heidi and I were pleased with the results.  I also had a reflector to add further fill if needed.  I plan to refine this as I go through chapter of the course.

The camera used was a Canon 5D MkII and I used a range of different prime lenses, 50mm, 85mm, and 135mm.  I did not mount the camera on a tripod as I find this to be very restrictive and clumsy for portraiture, also given the relatively small space to work in.  The final piece of equipment used was a flash meter to check the exposure.  

Whilst setting up the lighting my next door neighbor wandered in through the patio doors to see what I was up to.  I immediately recruited Niall to check that the lighting was working:

135mm, f/5.6, 1/125s, ISO 100
The lighting as expected was fairly even, but with enough shadow to model the contours of the face.  I had chosen the positioning of the lights to avoid illuminating the background, so was very happy with the deep black that I managed to achieve.

Heidi then joined me and replaced Niall as the subject.  First of all I wanted to create a facial close up and used the 135mm to enable me to stand back a little, in fact this may have worked even better with a 200mm prime as I still had plenty of working space.  My plan was to be able to shoot through the patio doors for longer shots, but heavy rain put paid to that idea.  In the following shots Heidi is seated.

135mm, f/8, 1/125s, ISO 100

I also wanted to experiment with a shallower depth of field, however, even on minimum settings my flash guns added too much light.  A 3-stop ND filter fixed this, although there was a very perceptible red caste to the images which had to be corrected in post processing:

135mm, f/2.8, 1/125s, ISO 100

This softened the image quite a bit, although the change in posing makes this a little difficult to evaluate.  Next step was to drop back a little a create head and shoulders shots:

135mm, f/8, 1/125s, ISO 100

135mm, f/8, 1/125s, ISO 100

These are the least interesting poses as they resemble passport photographs too much, but do bring out the structure of the face very well.  I also notice the deeper shadows on the face caused by poor placement of my fill light, next time I will place it in line with the camera, rather than to one side.  The other issue with my strobe placement is the double catch light in the eyes, which could be fixed in post production, but is not very desirable.

Pulling back further for a torso shot, I switched to my 50mm prime and took the following:

50mm, f/8, 1/125s, ISO 100

With this pose we chose to include Heidi's hands, the downward V of the hands balances well with the upward V of the face.  This created a very open and friendly position, however, I wanted something a little more casual and so turned the chair by 90 degrees:

50mm, f/8, 1/125s, ISO 100

I prefer this pose as it is more relaxed, but this is very subjective decision.  Finally I pulled all the way back for a couple of full body images

50mm, f/8, 1/125s, ISO 100

50mm, f/8, 1/125s, ISO 100

Once again prefer the less formal shot with the chair at 90 degrees, Heidi preferred the second shot.  At this point the focus upon the face is lost and the overall shape of the body becomes more important, although the choice of black clothing loses much of the upper body contour.

My final pair of images are an experiment in taking the fill light, removing the softbox and placing it directly behind Heidi pointing upwards to create a hair light. Again having done a little reading I now realize that the optimum position would have been high and pointing down.  I then used my reflector to provide a fill light.

85mm, f/11, 1/125s, ISO 100

85mm, f/11, 1/125s, ISO 100

I liked the effect on the second image, but realize I have a lot to learn about light placement.  I plan to augment my lighting set up with a couple more monoblocks and will return to this when I work on Exercise 6.